
REDIBOOK
Rediware Software and Services
Address and Phone Book
Rediware Software 2003
version 2.2.2
REDIBOOK was written because, even
though there are dozens of good phone book software, they all have different
features, some of which I like, and some which I don't care for. The one that
I have that I like the best is a program that is unstable, and I have been
told by the software company that they will not even support it. This led
to the conception and development of REDIBOOK. Everybody has different needs
when it comes to an 'address book' and this may or may not fill yours. It
is not a full-fledged organizer, but a comprehensive database for the purpose
of storing names, addresses, phone numbers, e-mail addresses, and family data.
I had hoped that this software was intuitive enough to be utilized without reading pages and pages of docs. However, as I added to the functionality portion of the program, I realized that some things will definitely need clarification if you are to utilize all the functions available. Therefore, reluctantly, here are the docs to REDIBOOK.
The simplest way for me to explain all the options and features is to insert a picture of the program form into this text. The different fields and controls are numbered. You can then refer to the appropriate text explaining the field or control.
Note that in this picture, all the controls are on. This will not be the case when you actually run REDIBOOK. Controls are on or off, depending whether they are active or not. I have tried to make REDIBOOK intuitive by enabling controls that are your current options, and disabling controls that are not an option at particular times. The controls are all active in this picture so that you can see them better.
Redibook is designed (as are most programs written for Windows) to tab to the next data entry field or command button with the TAB key, However, because some users like to use the ENTER key to tab, Redibook will accept either under most circumstances. The ENTER key will not work where it is impractical, such as a data field where multiple lines are accepted. In these cases, the TAB key must be used.
Here is the program layout:
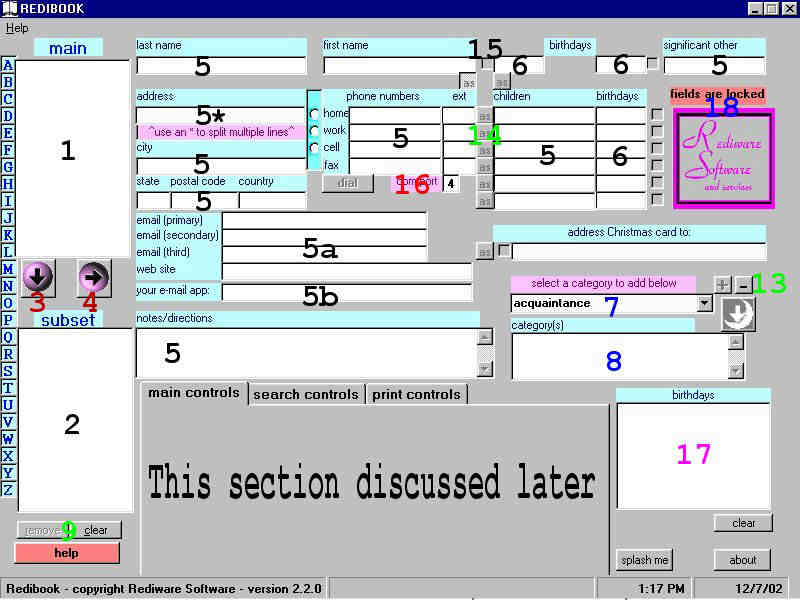
Note that your screen when running REDIBOOK may not look exactly like above. For example, the proportions will be different (this was resized to fit this document) and I still have to make some modifications and minor additions. However, the general layout will be the same. It also may not show some recent additions, but the text below will still discuss them.
When REDIBOOK is loaded for the first time, you will get a message prompt saying "REDIBOOK file not found." This is OK This just lets you know that there is no file created. If after saving your file, you get the same prompt, then you know that your file has been moved, deleted, or is corrupted. More about this later.
Because a file hasn't been created yet, a default list of categories (explained later) will be loaded into the sheet. Once you save your data, the file will be created, and any changes you make to the categories will be loaded next time. Therefore, the first time you run REDIBOOK, the "save to disk and exit "(group green-10) will be active. Even if you do not enter anything into the database, REDIBOOK will expect you to save the file, because the categories have been added. If you do not save before exiting, you will get the same results the next time you start REDIBOOK.
The fields and minor control buttons
main list (1-black)
Any data you have entered and designated to keep will appear in the main list. When starting REDIBOOK, any data previously saved will be loaded into main list. This data will appear as a last name, a comma, and a first name. (as in Doe,John) This is the list from which you may select from. If your list of data is longer than the field, scroll bars will enable you to scroll up and down. You may also click a letter (to the left of main list, not numbered) and the first name beginning with that letter will appear at the top of the list. Between these 2 controls, you can access the data in your list easily.
Clicking a data item once highlights it. Clicking the sendover button (red-4) will send the complete data over the datafields (5,6,15-black, 8-blue). Data must be in the datafields before you can edit or delete. If it isn't in the datafields, you cannot change the data.
Double-clicking the data item will send it over directly to the datafields. You can therefore bypass the sendover button by double-clicking the data.
senddown button (3-red)
Click an item in the main list once, and then click the senddown button to copy that item into your subset list.
sendover button (4-red)
Click an item in the main list once, and then click the sendover button to display all the information pertaining to that item in the datafields.
subset list (2-black)
Click a main list item once, and then click the senddown button (3-red) . That item will be copied into the subset list. What is in your subset list is important, because all print commands only operate on the items in the subset list. To view all the data of an item in your subset list, double-click it. This will send it over to the datafields. However, you will not be able to edit or delete it. You can only view it. Edit and delete only work if sent over from the main list. The subset list never gets saved. You can add to it and remove items from it without affecting your actual data. The subset list is only a temporarily list.
removebutton (9-green)
Click an item in the subset list and then click the remove button to remove it from the subset list. This does not delete the item from your data base, It just removes it from the subset list. You may select as many items in your subset list as you want before clicking the remove button. You may also deselect an item by clicking it again. All highlighted items in the subset list will be removed when the remove button is clicked.
clearbutton (9-green)
Clicking the clear button will clear all the entries from the subset list. Use this when you wish to compile a new list. This does not delete items from your database. It just clears the temporary subset list.
datafields (5-black)
The datafields labeled with a black 5 are standard text fields. When adding or editing an item, these are the fields you will be entering into or changing. The headings are self explanatory.
ONE NEAT LITTLE FEATURE: When printing out labels or envelopes, the name printed will appear as FIRSTNAME LASTNAME. However, there may be persons with different last names residing with the "main" person. If you enter both their firstname and lastname in their name box (significant other or children) REDIBOOK will know that that person has a different last name and will use that rather than the last name the data is listed under for envelopes and labels.
datafields (5a-black)
One of the added features of 2.0.0 is the clickable e-mail and website labels. If an e-mail address or a web site address exists in these fields, you will be able to click on the corresponding label (labeled e-mail (primary), e-mail (secondary), e-mail (third) or website). Moving the cursor over this area will turn the cursor into a hand. If the field contains data, clicking the label will automatically activate your internet explorer or mail server software. Highlight and copy the e-mail address before clicking to be able to paste the address in your e-mail 'to' field easily. Redibook does not enter this information automatically. If the field has no data, nothing will activate. If a website is not in the proper format (www.website.com, etc.) not action will take place.
datafields (5b-black)
To have the clickable e-mail application work correctly as described above, you must first tell Redibook where your e-mail application is. Click the "your e-mail app" label and a dialog box will open that will allow you to browse for your default e-mail application. When located, select it and click 'open'. The path and filename will then appear in the text box labeled 5b. (You can also enter this manually, but I recommend using the browse feature.) This field is not automatically saved upon selection, but will be saved when any added or changed addresses are saved. See the section "saving your defaults" below.
The datafield labeled notes/directions works a little differently in that you may enter whatever text you want. You will be able to read this text again by using the scroll bars.
datafields (6-black)
These fields are dates (birthdays). REDIBOOK expects you to enter the dates as 8/4/69 or 08/4/72 or 8/4/1957 or 08/04/1992 etc. If REDIBOOK does not understand your date format, it will let you know and ask for you to reenter it. REDIBOOK will understand other date formats, but to be sure, stick with month/day/year (mm/dd/yy).
datafields (15-black)
In the picture of the program, you will see only one 15-black. However there are actually 9. They are all the check boxes next to the birthday fields (8) and one next to the "address Christmas card" field. When adding a record or editing one, check these boxes if you send a birthday card (or Christmas card for the Christmas card field) and uncheck them if you do not plan to send a card. This check box will help you when you wish to search and compile a list of cards you wish to send out.
datafield (8-blue)
This field is to enter "categories." Categories are to categorize an entry. You may wish to categorize someone as a friend, family, work associate etc. This will aid you in searching and compiling a specialized list for your specific purposes. You can enter anything in this list you like. The category you enter into the category field box will remain with that particular record, but you will not have put that particular category in the "master list." This means that if you make an entry manually into the categories field box, you must remember how you entered it every time you use it for other records. There is a better way. Use the...
category master list (7-blue), category field box (8-blue)
As I mentioned, the first time REDIBOOK is loaded, no data file exists. Therefore default categories load from the program itself. These categories are loaded into the category master list. This is a drop-down list, and by clicking the arrow, you will be able to access all the possible selections. To copy a selection to the category field box, click the small down arrow (right of the list box) of the category master list and select a category by clicking it. That selection will be displayed at the top of the category master list and the selections will roll back up. Then click the large down-arrow (to the right of the category master list - not numbered,>purple down-arrow<) and that particular category will be listed in the category field box. You can have as many categories in there as you want. After all, you may have a friend who is also a work associate. You edit the category field box text as you would any other text. Highlight it and press delete. If, after editing the category field box you get two categories next to each other (like friendwork associate), just click your cursor where you want the separation to take place and then press enter. If you then save the record, it will be recorded and retrieved that way.
To add a category to the category master list, just enter a new category in the entry box of the category master list and then click the (plus button) +button (13-green). The category will then be added to the master list and will be saved as such. Note that to add it to the category field box, you must first click the dropdown arrow and select it from the newly modified list. Only then can you add it to the category field box.
To remove an entry from the category master list, select it and then click the (minus button) -button (13-green). That item will then be deleted from the master category list. You cannot actually edit an item in the list. All edits will be treated as a new item, and you will then have to delete the original item or they will both be in the list.
field status (18-blue)
The field status text needs no action from you. It simply announces that the fields are in one of two states: LOCKED ("fields are locked", background is red) or UNLOCKED("fields are unlocked", background is green) You can only enter or edit data if the fields are UNLOCKED.
phone dialer (16-red)
The dial button will be active when you have a telephone number displayed in the phone numbers datafields, and when you then turn on (click) one of the options (little circles left of the phone numbers). The option that you select will activate the phone number to the right of it. The dial button will be active, and by clicking it, a secondary dial box will appear with two options: Dial and Cancel. Click Dial and the phone number will be dialed for you as displayed. Click Cancel and you will be returned back to the REDIBOOK control page. This dialer is not intended to be used to send information via a modem. (Therefore, if you will notice, there is no option to dial the fax phone number) The number will be dialed by REDIBOOK. When you hear the called phone ringing, turn on or pick up your telephone and click the Cancel button. You will then be connected as if you dialed the number with your telephone. The dial button is a dialing convenience only, not a transmission outlet.
Note that any extensions also entered in the phone number datafield (at this time) are NOT dialed. You must click "OK" at the appropriate time, and then dial the extension yourself. This means that you can enter any data in that little box (that fits) if you wish. I have some of mine marked with "stor" (store), "ordr" (order), "tech" (tech help) etc.
birthday box (17-purple)
The birthday box will be understood easier when discussion of the search options take place. Therefore see that documentation later in this document.
as buttons (14-green)
The as buttons will be understood easier when discussion of the print options take place. Therefore see that documentation later in this document.
the com port box
Next to the dial button is the com port box. The default used by REDIBOOK is com port 4. If your modem does not dial your phone using com port 4, change the number in the box to match the com port your system uses to dial out. (usually 1-4) When you have found what the correct port number for your system is, save using the method below labeled saving defaults.
the help button
The red help button is one way to access this help file. When questions arise, click it.
The main controls tab
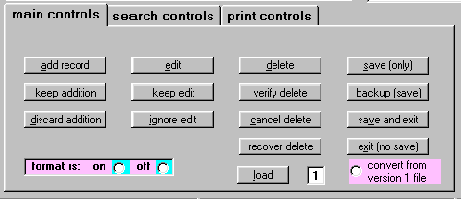
Any add/edit/delete functions as well as the sendover button will not be active unless you have the main control tab selected.
There are three tabs of controls. The first tab is called the main control tab. It consists of:
add record button
The add record button is just what it says. Click it when you want to add a new record. When you do, the fields will become unlocked and the rest of the control buttons will become disabled (except for two) and the cursor will be in the "last name" field, waiting for you to type in the information. You can enter the data in any order, and fill in only the information you want to record. You must fill in some text for the "last name" field. If this field is left empty, REDIBOOK will let you know about it.
ONE NEAT LITTLE FEATURE: Notice the "use an * to split multiple lines" label below the address field, labeled (5*-black). If your address has more than one line such as 999 Main Street Suite 123, enter it as 999 Main Street*Suite 123. (with the asterisk in-between the parts) This will effectively let REDIBOOK know that these are to be printed on different lines when printing envelopes and labels.
When you click the add record button, the two buttons that will become active are the:
keep addition button
discard addition button
When you are finished entering your information, click the keep addition button to keep the data, or click the discard information button to void all the new input.
format option buttons
Here is another one of those " ONE NEAT LITTLE FEATURE" things. If you click "format is: off", then everything you type in the datafields will be saved as you typed it. BUT if you select "format is:on", then each keep edit or keep addition will run all your text through a formatter. This formatter will capitalize everything that should be capitalized. This allows you to type everything in lower case and let REDIBOOK do the work! It is a fairly intelligent formatter and will do a good job. (this entry is saved to your desired default) A few exceptions: if the last name is McDoe, REDIBOOK will not know to capitalize the D. (you can do that yourself!) Also, in the "address Christmas card to:" box and notes/directions, you are on your own - REDIBOOK does not touch this field.
edit button
The edit button will become active when you have transferred a record over to the datafields. This is done by double-clicking a record in the main list, or single-clicking a record and then clicking the sendover button.
When you click the edit button, the fields become "unlocked" and you can then edit the information in the fields. The rest of the buttons become disabled, except for the:
keep edit button
ignore edit button
After you are finished with your edit, click either the keep edit button to save the edit, or the ignore edit button to forget about your edits.
delete button
If you have sent a record over from the main list, you can then press the delete button. When you click this button, the two buttons under it become enabled.
verify delete button
cancel delete button
Click the verify delete button to complete the deletion, and click the cancel delete button if you change your mind.
recover delete button
Also in the 'delete' column is the recover delete button. This button is only active if you have deleted a record. (or records) Clicking the recover delete button will cycle through all the records that you have deleted, and will ask you one-at-a-time if you want them restored. If you select "Yes", the deleted record will be restored. To restore another record, repeat the process. If you select "No", REDIBOOK will cycle to the next deleted record until all records have been checked. The recover delete button will remain enabled until all deleted records have been restored, or you restart REDIBOOK. If the button is active, you have deleted records that may be restored.
save and exit
exit (no save)
save (only)
If you have changed any records or categories (master list) the save to disk and exit and the save(only) button will be active. Select this to record all your data to your REDIBOOK file on your drive. If the save to disk and exit and save(only) buttons are not active, you have not changed anything (records). For saving changed preferences, see "saving your defaults" below. You can then click exit. If you have changed some things but decide you don't want to keep the changes, click the exit button. If changes were made, REDIBOOK will notify you and make sure that you want to exit without saving.
REDIBOOK does not save to disk each record as it is changed or created. It utilizes memory to store the information until you actually save it when exiting. This is a one-stop save and exit button, which I would love to see on some other "famous name" software. (are you listening out there?)
The save(only) button was created so that when you are entering long lists of data (such as when you first begin using REDIBOOK) you can periodically save your work. This is good practice when entering any kind of data with any software.
backup (save) button
While modifying REDIBOOK I inadvertently halted the program while REDIBOOK was saving data. Of course, this overwrites the data file and closes it, making the rest of the data unreadable. (I had already typed in my all my own data for use in testing) I had not made a backup of my data, as I should have. (I had to retype everything in again!)
Instead of requiring that you (and I) use Windows Explorer to make a copy for safety, I included the backup (save) button. You can use this at any time, preferably when you have added new data to your database. It will save a copy of Redibook.rbk in the same directory, but it will be called Redibook.bak. If by any chance you get a corrupted Redibook.rbk file, delete it, and rename Redibook.bak to Redibook.rbk. You can then load it with REDIBOOK, and then save it (normally). don't forget to save a new Redibook.bak!
load button
In the lower right hand corner of the main control tab is a load button and a small text box. When REDIBOOK loads, it loads a file called Redibook.rbk by default. This file will always be loaded (if it exists) at startup. You may, however, create or load any one of ten other REDIBOOK files. They are numbered 0 through 9. Just enter a digit (0-9) in the little text box and click the load button. If that file does not exist, you will have a blank database, just as when you ran REDIBOOK for the first time. You can then enter data in the same way as the default database. When you elect to save the data, it will be saved according to the digit you have entered in the textbox. It is possible to load one database file and save it as another, but I don't advise doing it - you may get confused as to which base is which! Therefore, do not change this number before saving your data.
These numbered files will be
named Redibook1.rbk, Redibook2.rbk etc. The default file does not have any number
after the filename, and can be reloaded by deleting any digit in the text box.
(it should be empty)
You do not have to use this
option. I included it into REDIBOOK because I find that I must sometimes create
a "special list" for myself or someone else. (a mailing list perhaps) I could
add the "special list" to my regular database and create a special category
for it, but I'd rather keep the lists separate. I can then delete the whole
list when I am finished. It will also provide a database for the rest of my
family, so that they can have their own file. Note that the different files
are not password protected - I doubt that much espionage is going on in the
average family!
Note that saving the file will add this digit to the filename. Be sure you do not load one file and save it (overwrite) as another file unless that is what you want to do.
convert from version 1 file (only for version 1 owners)
Use this option button ONLY if
you must load a file that you had previously saved with version 1 of Redibook.
Since version 2 saves more options, you must tell Redibook if these options
have not been previously stored. If you have only worked with version 2 of Redibook,
do not use this option. To convert files saved with version 1 to version 2:
Allow Redibook to load your default file. It may appear corrupted
in the display or you may get an error message. Don't be fooled if it looks
OK It is not correct. (look at the return address and the tabdown/tabover boxes)
Click the 'convert' option and click the 'load' button again. Add your default
e-mail application and tabdown/tabover values, if you want. Use the method described
below (saving your defaults) to activate the save button. Now click 'save' to
save it as a version 2 file. Don't forget to save the backup too!
To convert another file (0-9), allow your default file to
load. Enter a number in the load box. Click the 'convert' option. Click the
'load' button. Add your default e-mail application and tabdown/tabover values,
if you want. Use the method described below (saving your defaults) to activate
the save button. Now click 'save' to save it as a version 2 file. Don't forget
to save the backup too!
The Search/Compile tab
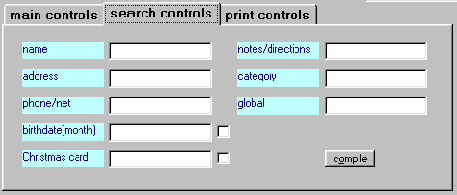
Make sure the subset list is empty (by clicking the clear button) unless you are doing multiple compiles. Enter the criteria to search for in the boxes.
If you want to search for a name, type the name in the box next to the label "name".
The birthday criteria will only accept a number representing a month. You cannot search for a specific date. If you enter 7, for example, REDIBOOK will find all birthdays in July.
If you check the checkbox next
to the birthday criteria field by itself (no text in the birthday criteria field)
REDIBOOK will find all birthday cards to be sent. If you enter a month in the
birthday criteria field without the checkbox checked, REDIBOOK will find all
birthdays for the given month. If you have a month entered and the checkbox
checked, REDIBOOK will find all birthdays for a given month that cards are to
be sent.
birthday box (17-purple) After clicking
the compile button to compile birthdays, all of the found items will appear
in the subset box, but will be listed by the main person's name for that record.
However, in the birthday box will appear the actual person who's birthday was
found. Therefore if a child's birthday was found, the father's name may appear
in the subset box, but the child's name will appear in the birthday box, along
with the actual birth date This box is only utilized for the birthday searches.
As with the birthday search, you can check the Christmas card criteria box. The textbox is to search for a string and the checkbox is to search for the "send card" check.
Put text in the notes/directions or category field to search those strings in that category.
Put text in the global field to find the text within the entire record.
Note that these search routines are in-string searches (it will find "tree" in "Main Street"). They are also not case sensitive (will find "wins" in "Winsor Place") They are also 'OR' searches - if you have data entered in more than one category, the compile function will find all instances where all are true OR instances where only one is true. The exceptions are the checkboxes, which only find instances that are both true. (text AND checkbox)
Any finds will copy the record into the subset list. You can then search for more items, remove a specific record from the subset, or add a specific record to the subset.
When you have the search criteria entered click the:
compile button
This will activate the search and compile the findings into the subset list. If either the birthday string search or birthday card check box is used, data will also be displayed in the birthday box.
When you have finished searching and compiling, click the:
The Print Control tab
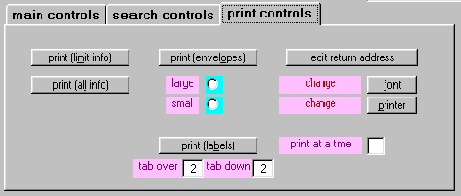
The print controls are enabled only if you have something in the subset field. This is because the print controls only work on the data that is in the subset field. The first button is the:
print (all info) button
Clicking this button will print out all the information available for all records in the subset list.
print (limit info)
Clicking this button will print the contact information for each record in the subset list such as name, address, phone numbers and e-mail information.
print at a time
This is not a button, but a label for the little box to the right of it. Enter a number into this box to tell REDIBOOK how many items to print at a time before sheet feeding. If you have envelopes to print and you must feed them by hand, enter 1. If you have an envelope feeder that holds 20 envelopes, enter 20. The same idea goes for labels and sheet info. (this entry saved as your desired default) See "saving defaults" below.
print (labels)
This will print labels
with the name and address or the records in the subset list. I would
suggest that you experiment with the fonts button (to change size, color, and
font) to find what will fit on your labels properly. Since I don't have specs
on all labels available, and don't have precise control over how each printer
will react, you may or may not be able to use the label feature. I have found
that most printers work well as long as you find the proper size font for the
labels you are using.
tabover and tabdown boxes
In this version I have added fields designated as tabover and tabdown. The numbers in these boxes will allow you to better control the label printing. The tab-over number designates how far from the left the address will start printing. The tab-down number tells Redibook how many linefeeds to do after each label. Experiment with the font size and these numbers to get the best result. These numbers are not automatically saved after changing, but will be saved if an actual record is saved. See 'saving your defaults' below.
enter return address
Before you print envelopes (for the first time), click the enter return address button below the print control cluster. A mini-box will appear, allowing you to enter your default return address. When satisfied, click the done button on the mini-box When you save your file, this default will be saved also, and will print on all envelopes in the return address area. You can change it at any time by reclicking the enter return address button. See 'saving your defaults' below.
The save buttons (on the main control tab) will not be activated by just the entry or change of the return address. To activate the save buttons, (if they are not active from data changes) double-click on one of the records in the main list, click edit, then click keep edit. The save buttons will then be active. (Of course if it is the first time running REDIBOOK, they will already be active before entering any data because the default categories "want" to be saved. This might be a good time to enter your return address as well.)
print (envelopes)
Use this button to print envelope addresses. Click the option buttons for "large envelope" or "small envelope". This option defines how much space goes in-between the margins and how far down the printing will start. NOTE that you MUST still set your printer's properties for "landscape" if you feed your envelopes sideways, and you must select the envelope size from your printer's properties. (this is, of course, if your printer supports these properties) Because each printer is different, I have tried to configure REDIBOOK to print "at least decently" on envelopes for most printers. I have 2 printers, 1 sideways-feed inkjet and 1 standard-feed dot matrix, The dot-matrix does not have any properties for "envelope sizes." This is where REDIBOOK uses ONLY the spacing programmed in (by selecting the "size-of-envelope-option" in the REDIBOOK program. The sideways-feed printer does a good job AS LONG AS I do not forget to change the properties to "envelope # (size) and select "landscape." It you do have these properties, they can be accessed by clicking the printer button (see below)
Before printing envelopes or labels, use this ONE NEAT LITTLE FEATURE:
as buttons (14-green)
Before printing, you can click an as button next to a name. (As buttons are not on the tabbed control, but on the main form) The envelope or label will then be addressed to the person beside the as button. The best use of this is for sending out Christmas cards. Search/compile your Christmas card list. Click the as button next to "address Christmas card to." Click a print button and all your envelopes or labels will be addressed with the text that goes in the "address Christmas card to" box. (Such as John and Mary Doe and family, instead of John Doe)
font button
Click the font button to select a font, a font size and a font color. (only works with the envelopes and labels - the print-info fonts are preset.)
printer button
Click the printer button to change your printer or change it's properties. Note that if you normally feed envelopes into your printer sideways, that you must change the orientation in your printer properties (using the printer button) to landscape. You must do this yourself.
One important note on changing your printer: If you select a printer to print to other than your default printer, that printer will become your default printer. You can change it back with REDIBOOK before you exit, or change it back via your settings/control panel (or your printers icon). I have no control over this, and apparently is one of the quirks Microsoft should address in the next version of VB.
saving your defaults
The "format is"(on/off) status, the com port number, the "print-at-a-time" number, the e-mail app location, the tab over and tab down numbers, and the "return address" will be saved with your data. Change these items to your preference, and when record data is saved to your drive, these preferences will be saved also. Note that changing these preferences do not activate the save buttons. To activate the save buttons to save your preferences (if you change them) sendover a name to the datafields (simply double-click a name or select one and click the 'sendover' button), click edit, and then click save edit. The save buttons will then be activated. Click 'save only' or 'save and exit' to save your changed preferences.
uninstalling Redibook
To uninstall Redibook, navigate to the Add/Remove Programs in the control panel and select "Rediware's Redibook". Click Add/Remove to uninstall. You will probably receive a notice that all files could not be removed. This is because Redibook creates files during operation. After uninstalling, navigate to the Redibook folder where it was originally installed and delete the folder and remaining files. Your uninstallation is now complete.
additional notes
This help file is also accessible from within REDIBOOK. Right below the "title bar" (top left corner) you'll find a help option. A help button has also been added.
This software is being distributed mainly to Rediware Software customers free of charge. This is our way of saying thanks! for allowing us to provide you with our services. As a Rediware customer, you are free to pass this program along to whomever you wish. All I ask is that you do not charge for this program, This also means "no copying fees."
REDIBOOK will also be available free at select locations for "non-customer" use. Non-customers are also free to pass REDIBOOK along.
Rediware customers have free software support via the Internet, and assistance is as close as your keyboard. Rediware customers will also receive (via Internet) free upgrades should there be any fixes, patches, or additional versions. Note that I must have your Internet address for this purpose. If you are not sure if I have it, e-mail me.
Non-customer support for REDIBOOK can be had for $10. This entitles you to any fixes or upgrades that may become available, and also pays for support via the Internet should you have any problems or difficulties with REDIBOOK. Should you decide not to register REDIBOOK, it will still run for you "after 30 days" and you will never encounter a nag screen or encounter a limited issue. All releases are full, non-restricted, 100% no-nag issues. The price is $10 because "that's cheap!" I'm all for putting an end to "overpriced software."
Rediware customers and registered users may also purchase a copy of the source code for an additional $5. REDIBOOK was written in Visual Basic 6.0 and contains approximately 30 pages of code. For those of you who are beginning VB, you will no doubt gain help by examining some of the routines to assist you in learning by example. If you do purchase the source code, please DO NOT distribute it! The source code is for your own personal use only.
Whichever way you go, freely add REDIBOOK to your system and enjoy.
Rediware Software and the author make no guarantees that REDIBOOK will suit your needs or expectations. Rediware Software and the author are not responsible for any system incompatibilities or file or system corruption due to the installing, usage, or uninstalling of REDIBOOK. REDIBOOK has been tested on several systems without incident, and none is expected. However this disclaimer must be in place should a software conflict arise. Note that the installation software and dynamic link libraries are written by Microsoft and are independent of REDIBOOK.
I welcome e-mail on any glitches or bugs that you may encounter. When reporting any bugs, please attempt to recreate the glitch in a step by step fashion so that you can relay to me the exact steps that caused the problem.
When installing REDIBOOK, the installation software will detect if you have older versions of dll files and ask you if you wish to install the updated versions. It is recommended that you do so. The versions contained in the REDIBOOK package are the latest available at the time of release and are official Microsoft-released libraries.
Update notes:
Some changes to Redibook have been made since it's inception. Some of the major changes are:
The website and e-mail address are clickable to activate your Internet Explorer or Mail Server software. See datafields (5a and 5b-black) for information on how this works. (note: these links may not work)
An additional help button has been added to the application. The help text in the menu at the top of the application still works, but the new help button is more prominent. (It is not shown on the screen shot in this doc)
Feel free to visit us on the web at: